Monday, December 3, 2007

16. Fabric Shopping!

(Let down alert – no photos yet. Sorry…)

While Susan and I have both been sewing for several years, neither one of us has really ventured into fine fabrics. I mostly stick with cotton prints and flannels, although I have used some knits, linens and bottom-weights. But dupioni silk? Not me…

Thus I think that, at first, we were both a bit overwhelmed by the task of selecting fabric for her dress. I felt like I didn’t even know the set of options that we had to choose from, which was unnerving. Luckily, the instructor from one of the online classes I took at www.patternreview.com, Sarah Veblen, graciously gave me advice via email and even sent me a swatch of the silk satin that she used to make her daughter’s wedding dress. (If you want to see an incredible creation, check out the wedding photos on Sarah’s website: http://www.sarahveblen.com.)

There is, of course, lots of good advice on the pattern review web site, including information about online shops for fine fabrics. And for people with a little bit of experience working with fine fabrics, I think that this is probably an excellent option. But in the end, for us, I think that the brick and mortar store experience was a necessity. We needed to see and touch bolts of fabric side by side – to unroll them on a cutting table and overlay bolts of lace – we just didn’t have enough knowledge in our heads to fill in the details that are missing from web site words and pictures and little swatches that come in the mail…

Luckily, there is a great fabric store in Orlando, The Sewing Studio Fabric Superstore (http://www.sewing.net), that has a large bridal section. A friend at work told me about it, and Susan and I visited it last Tuesday night (our usual rock climbing night.) Even that experience would have been overwhelming, if it wasn’t for the assistance of one of the employees, a knowledgeable young man named Scotti. He encouraged us to unroll bolts of fabric and lace on the cutting table and mix and match to our hearts’ content.

Susan had brought the pattern envelope and her cardstock cut-out of the dress outline. Scotti was able to give us advice about the level of firmness of the various fabrics and how well they matched the requirements of our pattern. (For example, too soft of a fabric wouldn’t hold the [horizontal] pleats in the front of the dress.) We used the cardstock cut-out to help visualize the possible combinations of fabrics and laces distributed across the bodice, body and godet. I can’t say enough about how patient, encouraging, and technically helpful he was!

And the evening was a success! We selected a rich, gorgeous, just-off-white silk satin for the dress, a burnished gold satin for the godet, and the most heart-stoppingly beautiful champagne colored lace to overlay the bodice and the godet. The lace has a distinct top and bottom. Along the bottom there are flowered vines growing upwards. The bottom is the most heavily patterned area of the lace, and the embellishments become sparser the higher up you go. I’ll align the bottom of the lace with the bottom of the godet, so that the flowered vines grow up from the bottom of the dress. I’ll use less detailed pieces of lace (from higher up) to overlay the bodice.

We debated using the gold satin for the bodice as well, but recalled my friend Dorothy’s advice, that adding this distinctive horizontal line under the bust might make Susan look shorter. So, Susan decided to leave the bodice in the same fabric as the rest of the dress, but use the lace overlay to connect it with the godet, so that the godet doesn’t jump out like this bit that is out of place from the rest of the dress. The matching lace should tie everything together nicely.

We also debated not using the gold satin at all, and just highlighting the godet (and/or the bodice) with the lace. That would have been beautiful, but perhaps more traditional. The combination that Susan decided on is, I think, uniquely her. While it will still clearly be a wedding dress, her personality and her voice will sing out in this dress. Just wait until you see it! :)

And that, of course, gets us to the question of time and schedule. Originally we had planned to go back and buy the fabric on Saturday. But it turns out that this store has a huge sale on New Year’s Day – EVERYTHING in the store (including the lace) is 40% off! We’re going to keep a close eye on Susan’s selections – stopping in every week in December to make sure that they aren’t running low on anything. (In fact, I’m going tomorrow night.) I’m not going to let these choices slip away from us, but, if everything goes well, I’ll make the purchases on January 1st, 2008.

Saturday, December 1, 2007

15. Last Diversion of 2007

Okay, ONE last miscellaneous sewing project before Christmas… This is it, I promise. ;)

Speaking of promises, the reason I’m doing this is that I promised to make chalk bags for two rock climbing friends. One friend is Michelle, who climbs up in Ohio with my parents and the other is Alfred, who climbs with his mother at our gym in Orlando. Chalk bags are drawstring pouches that rock climbers wear at their waists. They contain (wait for it….) chalk, which climbers brush on their hands to keep them from getting sweaty and slippery. (Other athletes do this too – you’ve probably seen gymnasts dip their hands in chalk before starting a routine on the uneven parallel bars, for example.)

It looks like it should be something simple to sew, and I started working on coming up with my own pattern a few years ago. After a bunch of experiments and variations, I think I’ve settled on “the one”. Interestingly (and perhaps foolishly) I never did the most obvious thing to do – I never purchased a commercial chalk bag and took it apart. I probably should have done that ages ago. At first, it seemed like it should be easy enough to figure out on my own, and now that I have a working pattern there doesn’t seem to be much point…

My chalk bags have 3 layers – an inner layer of fleece, an outer decorative layer of whatever fabric the climber chooses, and a middle layer of medium-weight canvas, to give it some structure and make it stand up on its own. All three layers are cut from the same pattern and constructed the same way.

My first pattern for the pouch was a rectangle, sewn into a column, with a circular piece stitched in one end to close up the bottom. But I HATED sewing the bottom on, and as I sewed various purses and bags from commercial patterns, I learned other ways to construct a 3-D pouch. Here is the pattern I use now and some shots of the construction:


(Sorry for the poor quality of the photos.)

While there is no single “right” set of dimensions, here are the ones that I use: Both the long side seam and the width of the body are about 8 inches long and the width of the (centered) bottom seam is about 4 inches long. The incut is approximately 2 inches by 2 inches.

And here is the final version, inside and out:


As I said, using this pattern I make 3 identical pouches, out of fleece, canvas and the “fashion” fabric (typically a cotton print).

The next step is to prepare for the drawstring, by putting metal eyelets into the middle (canvas) and outer (cotton) layers. (You can get eyelet kits at Joanns.) I usually put them about 2 inches below the upper rim, and I interface the outer layer first, because the cotton is too flimsy to hold the eyelet on its own.

Here is one I’m working on now - the three pouches and a closer view of the eyelets:


Now, I insert the loops to hold the drawstring into the inside of the middle (canvas) layer. I only use 3 loops and I make them out of 3 inch pieces of elastic. The goal is to be able to close up the inner (fleece) layer without too much distortion of the outer 2 layers, which is why I make the loop so long and stretchy. For the drawstring, I use about 30 inches of cord and I burn the ends with a match so that they don’t unravel.

Oh, I learned the hard way to stitch the drawstring (at its midpoint) to the middle loop (only). If you don’t, the people that you give these chalk bags to will, at some point in time, pull out the drawstring and then ask you to thread it back through the loops! I can tell you from experience that this is possible, but NOT fun. So, sew that puppy in permanently!

Insert inner pouch into middle pouch – wrong sides together (and toward the inside), keeping drawstring cord in a loop around the circumference of the fleece layer such that it can be used to tighten inner pouch. Baste these 2 pouches together around the top.


Now you’re probably expecting me to slide this combined piece into the outer layer, and baste all 3 layers together, before finishing the upper edge, right?

Well, this is the really cool part of my design. My design is not for just any old chalk bag. It is for a chalk bag with interchangeable covers! In other words, you can make multiple outer layers (cotton prints) for the same chalk bag, and switch between them whenever you want!

So, my next step is to add a loop to this piece, so that the chalk bag can be clipped onto a climbing harness. I use about 5 inches of strap, folded over to make a 4 inch (circumference) loop with a 1 inch tail. Both ends of the strap have to be burned with a match to prevent fraying.


I use 2.25 inch wide grosgrain ribbon to make the binding around the top edge. (As with the cord and the strap, I burn the edges to prevent fraying.) Before sewing it into the pouch, I stitch hook and loop tape (for example, Velcro ®) – the hook (stiff) side – across one length, close to the edge. Then I sew this binding inside the pouch , with the hook tape sticking up over the top. The idea is that the pouch slides into the decorative outer layer (cotton) and this binding folds over and the hook and loop tape holds the pieces together.

You'll notice that by putting the strap on first, this binding doesn't meet in the back, but rather a 1 inch gap is left. This may seem like a design flaw, but I do it deliberately, to account for the fact that my covers aren't always a 'perfect' fit. If a cover is a little bit too big, then this small gap in the binding allows room for the excess fabric, leaving the majority of the bag looking smooth and well fit.


Inside the bag, there is a perfect spot for your label - right over the strap. ;)


That finishes the main body of the chalk bag! So, the only thing left to do is to finish the outer layer. You do this by turning over the top one quarter inch and stitching in place, and then sewing a piece of hook and eye tape – the loop (soft) side this time – all around the top.


And, now, you are ready to 'dress' your chalk bag! Here is a series of 3 pictures, illustrating the process of putting a cover on:


I usually start folding over the top binding in the front center and work my way around each side to the back. If the cover isn’t a perfect fit, you can hide the excess fabric in the small open area in the back, underneath the belt loop. ;)

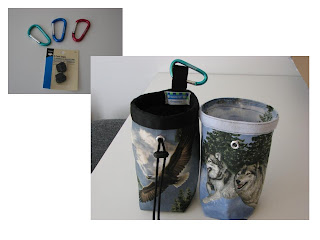
For the finishing touches, add a cord stop and a small carabineer…

And voila! You have a chalk bag fit for a 5.15 climber, with interchangeable covers!


If you happen to climb, or have friends who climb, you are welcome to use this design to make chalk bags. If you find ways to improve the design, please let me know! I would ask, however, that you don't use my design to produce and sell chalk bags with interchangeable covers. Thanks. :)


PS - my next post will be about shopping for the wedding dress fabric!